Wednesday, May 18, 2011

Fender Apron, Radiator Support

Before moving to Oregon, I had put my Mustang into storage in the middle of replacing the driver side front fender apron and radiator support. I had cut out the damaged radiator support and fender apron and then purchased (now 7 years ago) the new panels, which then I had temporarily hung them in place.  At some point in time during storage, it appears that something had come into contact with areas of my new fender apron and started to cause some rust. I ordered a new panel this past Saturday, but to continue the progress, I can work with the rusted panel to install the radiator support.


I held together the radiator support and fender apron by using locking pliers so I could take a few measurements and look at the fit. The radiator support is a reproduction unit that I purchased 7 years ago. It's made in Taiwan, by a company called Apex if I can recall correctly. Its 20 gauge sheet comes e-coated for protection. I took some pictures shown below showing the fitment.


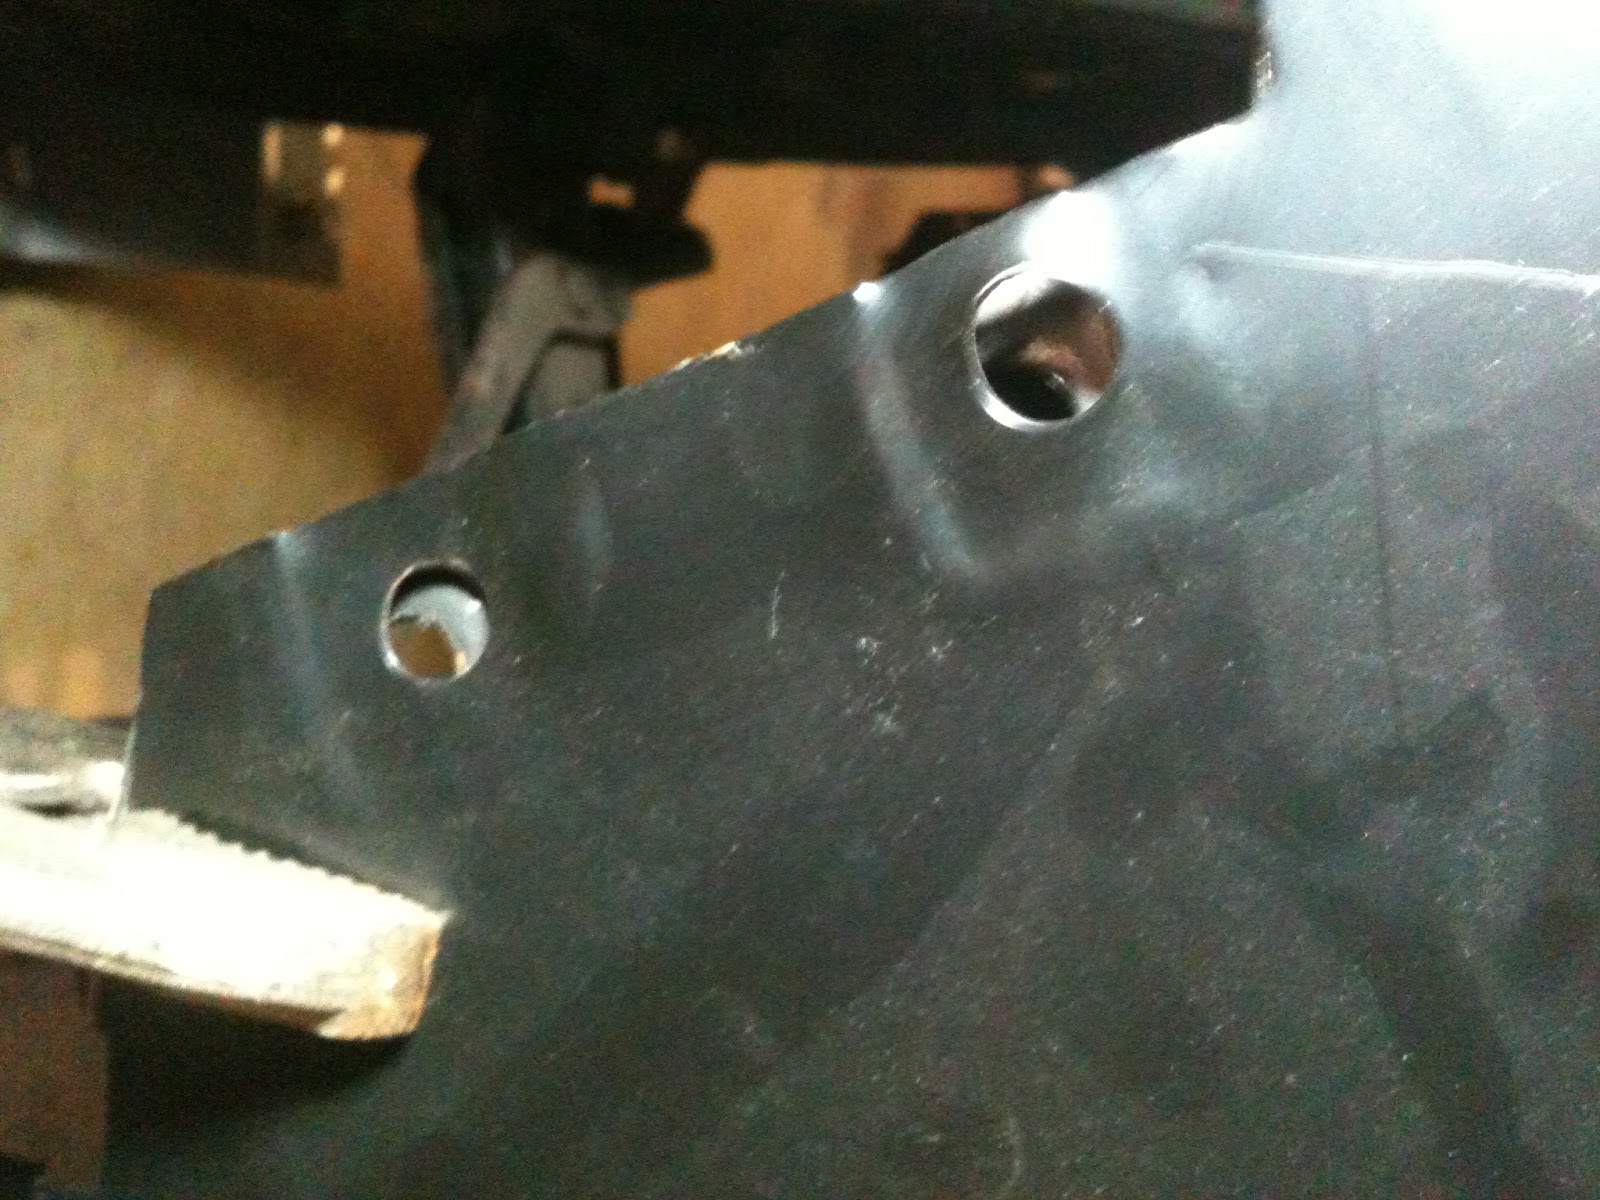
At this point, I wasn't sure if the panels were aligned correctly, or if it was just a poor reproduction. I took a few measurements and this is what I found. Top of each fender apron to fender apron were exactly 46" long, exactly the same as the reproduction unit. Measure from the opposite corner of the engine bay from where the rear fender apron meets the cowl, I have a measurement of 57.5" to the top hole on the passenger side fender apron, and 57.5" to the top hole on the driver side radiator support. The gaps on the inside of the frame rails were fine and there wasn't any more adjustment to be had with the support. Looking at the unit, it seems the holes were stamped 5/16" too far to the top left.

That leaves me two options, either repair the reproduction piece, or replace it. I've decided to rule out repairing it knowing they are thicker reproduction units out there with more than likely better quality. I purchased a piece made by Dynacorn that also includes the cross member, which will save me some hammer and dolly work, and is 18 gauge compared to the 20 gauge unit I have now.

Now it's just a matter of waiting for more parts.

Passenger Side Floor

Last month I started working on the passenger side floor pan. At this point when I first started working on the pan, I also did not make a final decision on the inner rockers that I was going to be adding. The previous owner of the car had cut out two rust areas toward the front and rear of the pan (pictured below) and riveted a galvanized sheets of sheet as a fix. Under the patched holes, angle iron was riveted in as supports to hold the floor together. I removed the seat pan and galvanized sheets, the picture below is the result.


I then used my Craftsman Professional Reciprocating Saw that I picked up brand new for $60 and my Dewalt D28402 Angle Grinder used for $32 both at a local pawn store to cut out the offending areas.


I ran into several problems before I could start fitting my replacement floor pan. After removing the shifter and dropping the transmission, I noticed that the previous owner had cut into the floor pan brace (pictured below). The passenger side toe board also had some significant rust damage from being covered up by the galvanized sheet and not addressed (not pictured).


The firewall extension panel (toe board) was on back order, so it gave me time to think about possible routes to address these issues. At this point, I did more research and decided to add inner rockers and a one peice seat pan as explained in my previous post here. The repair in question will be to do the following:
  1. Replace the toe board with a replacement panel (on back order).
  2. Install passenger convertible inner rocker (on back order).
  3. Install passenger full length floor pan (already have, will need to have lip braked to match new rocker)
  4. Remove driver side seat pan and floor
  5. Install driver side convertible inner rocker (on back order)
  6. Install driver side floor pan (need to order)
  7. Install one peice convertible seat pan (need to order)
  8. Patch the floor pan brace
  9. Patch the transmission tunnel forward of the shifter
While I'm waiting for parts, I'll begin working on replacement of the fender apron and radiator support which will be a next post.

The Purpose, and the Plan

In my journey to find a project car, I had always put in the back of my mind that I wanted something that I could slowly build up to take to the week night drags and bracket race. The previous owner had already set up the car just for this purpose, and it came with a 11.5:1 CR 302, manual C4, 3000 stall, 9" with 3.70's and a spool. Most of the luxury options were removed out of the car to shave weight, and it also came with a disc brake conversion and power steering. After taking ownership of the car, a fiberglass cowl hood was added, suspension was rebuilt and the power steering was converted into manual.

After storing the car for seven years, I've decided to take a different route for the car. I've always have had a love for road racing, and particularly the American Iron series. After reading and watching a few Mustangs be built up as tributes or replications of the FIA Group 2 Sedan cars from the Trans Am series, thoughts started floating around in my head about building a road racer. The plan I've put together is to build a purpose built track car, as well as one that I can drive home at the end of each session. The purpose of my build is to participate in local HPDE (High Performance Driving Event) sessions and other NASA events. My goal in this build is not to replicate or reproduce the Trans Am series racers, but use them as an inspiration to build a more modern version that conforms to more recent regulations.

To begin my project, I will be starting at the foundation of the car, the chassis. As stated in my previous post "The Short List" there are areas of this vehicle that need to be addressed from either damage, rust or age. In addition to these areas, modifications will be added to improve the torsional stiffness. Two websites outline in almost perfect detail the modifications that will be performed. Julians (pictured below) and a thread on Stangnet "Torsional rigidity test: 67 coupe".


Improvements will be made to the chassis by adding a number of modifications, including adding inner rocker panels from a convertible, which will be a major improvement to the torsional stiffness of the chasis. The driver and passenger individual seat pans will be removed and replaced with a one peice convertible unit that ties both rockers together and reinforces the transmission tunnel. Subframe connectors will be added along with jacking rails to tie them into the rockers. A trunk divider panel will be added and modifications will be done to reinforce the shock towers.

The first order of business with the project will begin with repairing the damaged areas first, which will follow shortly in my next posts.

Tuesday, May 17, 2011

The Shortlist

The first item of business after moving the Mustang to it's new home was to make a list of damage and what would need to be replaced sheet metal wise (exlcuding exterior panels such as fenders, valances).

Front end: Driver side front fender apron and radiator support had been replaced after an accident, the repair was poor so they'll need to be replaced. Radiator support crossmember has minimal damage and could be repaired with a hammer and dolly. Shock tower cap on passenger side is cracked and needs to be replaced.

Middle: Driver side front floor pan has rust holes forming and was patched over using a galvanized panel of steel. The driver side rear pan has severe pitting, so a full floor pan will needed. Passenger side had two large holes cut out and panels were riveted on top (pictured below). Supports were made using angle iron and also riveted in place. Passenger side toe board also has a significant amount of rust. A full passenger side pan and toe board will need to be replaced. New seat pans will need to be installed as well. Previous owner hacked up the transmission tunnel shifter hole to fit a B&M shifter cable, and cut through 75% of the floor brace that runs inside the transmission tunnel.


Rear end: Passenger side of the tail light panel has small rust areas that would either need to be patched or replaced. The passenger side trunk floor is beat to hell, it's creased, crinkled, dented and it makes me wonder if the car was hit from behind but it will also need to be replaced.

To Repair / Replace:
Driver side front fender apron
Radiator support and crossmember
Shock tower cap
Passenger side toe board
Passenger side full floor pan
Driver side full floor pan
Seat pans (one peice)
Transmission tunnel patch near shifter hole
Floor pan brace
Tail light panel
Passenger side trunk floor pan

The History

When I originally purchased the Mustang, the only items that still were original on the car was the dash trim, pad and instrument gauges. Everything else had been replaced, or removed throughout the years and various owners. From what I know, and I have been told, the car was originally purchased in Denver, CO and eventually sold to an owner that moved to California. The transmission (C4 Automatic) matches the car, but is not from this vehicle, the engine block was sourced from a Galaxie, and the rearend is a 9" which was not original to the car.

Exterior: Sunlit Gold Metallic
Interior: Nugget Cold Crinkle and Kiwi Vinyl
Engine: 289 2V V8
Transmission: C4 Automatic
Rearend: 2.79:1 8"
Options: Luxury Interior, Air Conditioning, Power Steering, Drum brakes


Given the options that this vehicle had, the pictures above show what my car looked like stock. I plan to order a Marti report later this year, and although it doesn't have any historical value or super rare options, I'm excited to see what else I can learn about it.

The Engine, and Damage

My luck ran short after a few months of owning the car when the engine developed a slight knock at high RPM's. In March 2005, the engine was torn down and reassembled. The picture above was damage caused from excessive harmonics as a result of detonation. Adjusting timing, running the car on 100 octane and replacing a damaged plug did not do the trick. The engine at the time also started leaking oil from the rear main seal and at the front of the oil pan. The slight knock, was a symptom of detonation that would occur when spinning the engine over 5000 RPM. I sent out a sample of the oil for analysis, and the results came back conclusive for contamination. The oil filter had a large amount of fine metal fragments and my drain pan magnet was cluttered with fragments. The hole in the picture you see above was from harmonics causing the windage tray to bounce, catching the corner of a connecting rod bolt and shearing the windage tray off the studs.


After the tear down, damage was found on #1 cylinder connecting rod bearing, and slight scoring on the journal that was polished out. The timing chain had over an inch of play, which more than likely caused havoc on timing. Valve seats had significant damage which most likely caused hot spots to develop, and led to detonation.


After a quick trip to the machine shop, the block and rotating assembly was hot tanked, magnafluxed, honed and checked over. The cylinder heads (Trickflow Trackheats) were cleaned up and had new valve seats installed. Instead of going back with a timing chain and windage tray, I picked up a timing gear set for less than I'd pay for a double roller (previous owner didn't want a noise model). I also picked up a Canton girdle which the windage tray attaches to rather than studs.


Everything was buttoned back up. The headers are just a cheap Hedman 289/302 model that had some ceramic paint thrown on it to cover up the rust to make for a nice picture. I planned on ditching the Holley 750 4160 for a 700 4150.


At the same time the engine was being rebuilt, I had the transmission and torque convertor rebuilt as well. It's a C4 auto with a full manual valve body (no trans brake). The torque converter is a 3000 RPM TCI unit. Everything ended up being bolted in place back into the car as a temporary means of storage. With the plans I have for the car now, I've decided not to go with the 302 and C4. Instead, these will be stored and kept for a future project (the wife wants a 65' coupe).

The Mustang


I have always dreamed of having a classic Mustang, and a project that I could slowly work on while taking it out on summer evening cruises with the local club. I found this one on Craigslist in San Jose on September 2004, and then picked it up for $7,200.

Make: Ford
Model: Mustang
Body Style: Hardtop
Engine: 302
Transmission: C4 Automatic
Interior: Deluxe Black Vinyl
Exterior: Teal Pearl (Honda?)
Wheels: Cragar Super Stars
Options: Power Steering, Manual disc brakes

Upon the  purchase, the car seemed to be solid, and for the most part in pretty good shape. It appeared to be mildy rust free (So I thought!) and according to the previous owner, had been in a minor accident. The damaged caused from the accident was repaired, but the repair did not look factory, therefore I would also need to repair that by replacing the fender apron and radiator support. There had been previous modifications done to the car that were questionable, at best. Repairs had been performed on the floor boards by torching out areas of rust and riveting steel plates on top. The black vinyl interior was in great condition, the deluxe dash trim was original and looking a little aged, but still in good condition. The drivetrain was stout and put down some great numbers and along with the options included made the overall purchase fair in my opinion.

Long story short, my plans I had for the car had to be put on hold because I relocated out of state to Portland, Oregon. Over the past seven years, the car had been kept in storage in California, up until this past March when finally I've decided that I can once again restart this project. On March 14, 2011, the Mustang was strapped down to a trailed and hauled back up to it's new home in Oregon.


Here is how she sat upon her arrival. I have a small garage (18x20) so the first item purchased was a pair of wheel dollies from Harbor Freight. I scored them for a total of $50 for all four, and they work great. The interior, and fenders were peeled off in this picture to give the car a thorough inspection. The details of my inspection will be in the next post.